Wednesday, January 25, 2017

Resilient Distributed Dataset (RDD)

In this post, I am going to provide breif introduction about Spark RDD, different ways to create RDDs and different operations on RDD.

What is a RDD?
Resilient
i.e fault-tolerant If the data in memory (or on a node) is lost, it can be recreated with the help of Lineage Graph.
Distributed
data is chunked into partitions and stored in memory across the cluster.
Dataset
initial data can come from a file or be created programmatically.

Resilient Distributed Dataset (RDD), the basic abstraction in Spark. RDD are immutable (does not change once created), partitioned collection of objects. Each RDD is split into multiple partitions (like inputsplits in MapReduce) and which performs in-memory computations on large clusters in a fault-tolerant manner and and all the function are performed only on RDDs.

Additional traits:
  • RDD does not actually contain data but just creates the pipeline for it.
  • Lazy evaluated - Data inside RDD is not available or transformed until an action is executed that triggers the execution.
  • Cacheable - RDDs can be cached across parallel operations
  • In-memory computing: Using RDDs iterative algorithms in machine learning and graph computations and executing ad-hoc queries on the same dataset efficiently by reusing intermediate in-memory results across multiple data-intensive workloads with no need for copying large amounts of data over the network.
Creating RDD's 
RDDs can be created in two different ways:
  • Hadoop Datasets :
    • Referencing an external dataset in any external storage system supported by Hadoop (Eg: Local FileSystem, Amazon S3, HBase, Casandra or any data source offering a Hadoop Input Format) in the driver program.
  • Parallelized collections
    • By parallelizing a collection of Scala objects (like List)
Before moving further let’s open the Spark Shell by switching into the home directory of Spark and type the following command. It will prompt Scala shell and also load the SparkContext as sc.

$ ./bin/spark-shell

Now you can start Spark programming in Scala.

Creating a RDD from Collection Object
When you want to create a RDD from an existing Scala collection object like Array, List, Tuples by calling SparkContext’s parallelize method on collection in driver program

scala> val data = Array(1, 2, 3, 4, 5)
data: Array[Int] = Array(1, 2, 3, 4, 5)

scala> val distData = sc.parallelize(data)
distData: org.apache.spark.rdd.RDD[Int] = ParallelCollectionRDD[0] at parallelize at <console>:29

In the above program, first I created variable assign with an array of 5 elements and then I created RDD named 'distData' and uniquely identified (by id) by calling SparkContext’s 'parallelize' method on array.

To view the content of any RDD by using 'collect' method. Let see the content of distData by typing the below command:

scala> distData.collect()
res0: Array[Int] = Array(1, 2, 3, 4, 5)

To view RDD's uniquely identified inside a SparkContext
scala> distData.id
res1: Int = 0

An RDD can optionally have a friendly name accessible using name, lets see how to set friendly name:
scala> distData.name = "Sample Data"
distData.name: String = Sample Data

scala> distData.name
res3: String = Sample Data


Creating a RDD from External sources
You can create a RDD from external dataset in any external storage system supported by Hadoop (Eg: Local FileSystem, Amazon S3, HBase, Casandra or any data source offering a Hadoop Input Format) in the driver program.

Lets create a RDD by loading a file:
scala> val lines = sc.textFile("sample.txt")

In the above program, created RDD by using SparkContext's textFile method. This method takes an URI of the file path either local (file://) or a HDFS (hdfs://) or S3 (s3://)

Note: RDD's resides in a SparkContext and SparkContext creates a logical boundary, RDDs can't be shared between SparkContexts.

Operations on RDD
Supports two kinds of operations on RDDs:

  • Transformations - which create a new dataset from an existing one
  • Actions - which return a value to the driver program after performing the computation on the dataset.

In next post, we will play with RDD by applying different operations. If you have any questions or doubts feel free to post them in the comments section.

Happy Learning :)

Monday, January 16, 2017

Loading HBase Table Data into Spark Dataframe

In this blog, I am going to showcase how HBase tables in Hadoop can be loaded as Dataframe.

Here, we will be creating Hive table mapping to HBase Table and then creating dataframe using HiveContext (Spark 1.6) or SparkSession (Spark 2.0) to load Hive table.

Let us create a table in HBase shell.

Create a table using following command:
hbase(main):002:0> create 'custumer_info', 'customer', 'purchases'

A table has been created with name 'custumer_info' and column families 'customer' and 'purchases'.

The scheme of this table can be checked using the following command:
hbase(main):003:0> describe 'custumer_info'

Let us try inserting some sample data into the table by using the following command:
hbase(main):004:0>put 'custumer_info', '101', 'customer:name', 'Satish'
hbase(main):005:0>put 'custumer_info', '101', 'customer:city', 'Bangalore'
hbase(main):006:0>put 'custumer_info', '101', 'purchases:product', 'Mobile'
hbase(main):007:0>put 'custumer_info', '101', 'purchases:price', '9000'

hbase(main):008:0>put 'custumer_info', '102', 'customer:name', 'Ramya'
hbase(main):009:0>put 'custumer_info', '102', 'customer:city', 'Bangalore'
hbase(main):010:0>put 'custumer_info', '102', 'purchases:product', 'Shoes'
hbase(main):011:0>put 'custumer_info', '102', 'purchases:price', '3500'

hbase(main):012:0>put 'custumer_info', '103', 'customer:name', 'Teja'
hbase(main):013:0>put 'custumer_info', '103', 'customer:city', 'Bangalore'
hbase(main):014:0>put 'custumer_info', '103', 'purchases:product', 'Laptop'
hbase(main):015:0>put 'custumer_info', '103', 'purchases:price', '35000'

We can check the number of records inserted by running the below command:
hbase(main):016:0> count 'custumer_info'

We have successfully created a table in HBase. Now let us check out this data in Spark.

Create a HiveTable mapping to HBase table by using following command:
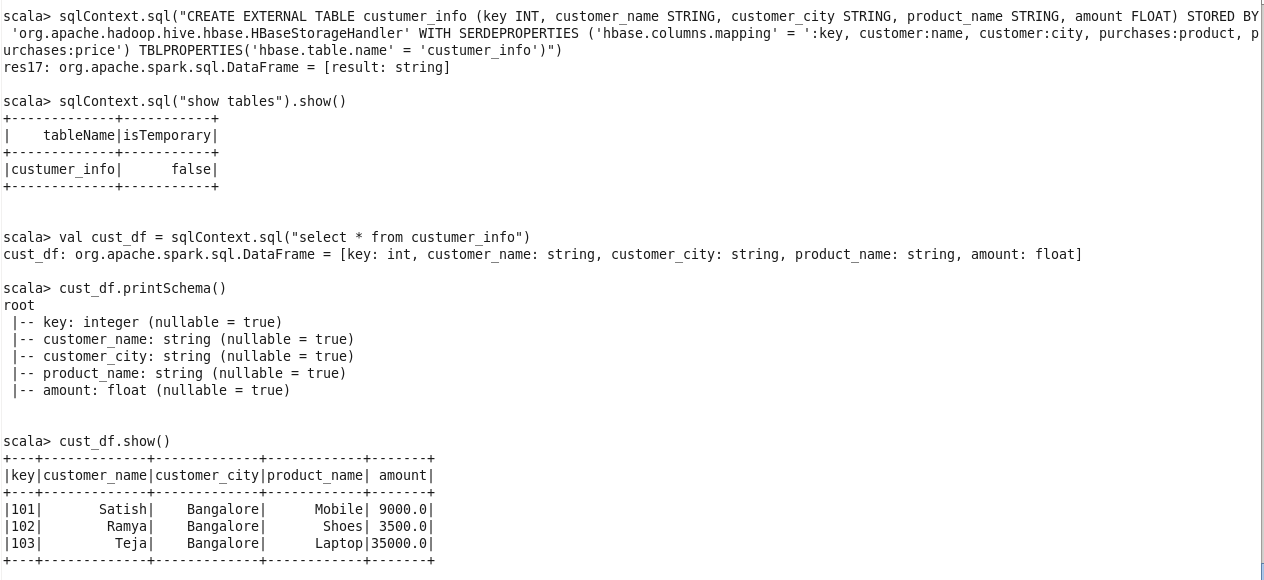
sqlContext.sql("CREATE EXTERNAL TABLE custumer_info (key INT, customer_name STRING, customer_city STRING, product_name STRING, amount FLOAT) STORED BY 'org.apache.hadoop.hive.hbase.HBaseStorageHandler' WITH SERDEPROPERTIES ('hbase.columns.mapping' = ':key, customer:name, customer:city, purchases:product, purchases:price') TBLPROPERTIES('hbase.table.name' = 'custumer_info')")

we can check whether table is create or not by running following command:
hiveContext.sql("show tables").show()

Let us create Dataframe by running the below command:
val cust_df = hiveContext.sql("select * from custumer_info")

Now we have successfully loaded the DataFrame cust_df with the data in the table custumer_info which is in the HBase table.

You can see the DataFrame cust_df schema and contents of the custumer_info table using the DataFrame cust_df by using the following command:

cust_df.printSchema()

cust_df.show()


The whole stack trace is shown in the below screenshot, where you can see that the data in HBase table has been loaded into the Spark DataFrame successfully. Any kinds of operations can be performed on this data.


I hope this blog helped you in understanding the concept in-depth.

Enjoy Spark!


Saturday, January 14, 2017

Creating a SparkContext

In this post I am going to explain about SparkContext and creating SparkContext in Scala, Python and Java.

SparkContext is the entry point to Spark for a Spark application and establishes a connection to a cluster. SparkContext allows many functions like get and set configurations of the cluster for running or deploying the application, creating objects, scheduling jobs, canceling jobs and many more.

Now we will see how to create a new SparkContext in Scala, Python and Java

Scala
import org.apache.spark.{SparkConf, SparkContext}

// 1. Create Spark configuration
val conf = new SparkConf()
  .setAppName("Your Spark Application Name")
  .setMaster("local[*]")  // local mode

// 2. Create Spark context
val sc = new SparkContext(conf)

Python
from pyspark import SparkContext
from pyspark import SparkConf

''' 1. Create Spark configuration '''
conf = SparkConf()
.setAppName("Your Spark Application Name")
.setMaster("local[*]")

''' 2. Create Spark context '''
sc = SparkContext(conf=conf)

Java
import org.apache.spark.SparkConf
import org.apache.spark.api.java.JavaSparkContext

// 1. Create Spark configuration
SparkConf conf = new SparkConf()
.setAppName("Your Spark Application Name")
.setMaster("local[*]");

// 2. Create Spark context
JavaSparkContext sc = new JavaSparkContext(conf);

Once a SparkContext instance is created you can use it to create RDDs, Accumulators and Broadcast variables, access Spark services and run jobs (until SparkContext is stopped).

Enjoy Spark!

Setup Environment for Spark Development on Windows

In this post, i am going to show you how to setup Spark without Hadoop in standalone mode in windows.

Step 1: Install JDK (Java Development Kit)
Download JDK7 or later from http://www.oracle.com/technetwork/java/javase/downloads/index.html and note the path where you installed.

Step 2: Download Apache Spark
Download a pre-built version of Apache Spark archive from https://spark.apache.org/downloads.html. Extract the downloded Spark archive and note the path where you extracted. (for example C:\dev_tools\spark)

Step 3: Download winutils.exe for Hadoop
Though we are not using Hadoop, spark throws error 'Failed to load the winutils binary in the hadoop binary path'. So download winutils.exe from winutils.exe and place it into a folder (for example C:\dev_tools\winutils\bin\winutils.exe)

Note: winutils.exe utility may varies with OS. If it doesn't support to your OS, find supporting one from winutils and use.

Step 4: Create Environment Variables
Open Control Panel -> System and Security -> Click on 'Advanced System Settings' -> Click on 'Environment Variables' button.
Add the following new USER variables:
JAVA_HOME <JAVA_INSTALLED PATH> (C:\Program Files\Java\jdk1.8.0_101)
SPARK_HOME <SPARK_EXTRACTED_PATH> ( C:\dev_tools\spark)
HADOOP HOME <WINUTILES_PATH> (C:\dev_tools\winutils)

Step 5: Set Classpath
Add following paths to your PATH user variable:
%SPARK_HOME%\bin
%JAVA_HOME%\bin

Step 6: Now Test it out!
1. Open command prompt in administrator mode.
2. Move to path where you setup the spark (i.e, C:\dev_tools\spark)
3. Check for a text file to play with like README.md
4. Type spark-shell to enter spark-shell
5. Execute following statements
val rdd = sc.textFile("README.md")
rdd.count()
You should get count of the number of lines in that file.

Congratulations, you setup done and successfully run first Spark program also :)

Enjoy Spark!

Wednesday, January 4, 2017

Create DataFrame from list of tuples using Pyspark

In this post I am going to explain creating a DataFrame from list of tuples in PySpark. I am using Python2 for scripting and Spark 2.0.1

Create a list of tuples
listOfTuples = [(101, "Satish", 2012, "Bangalore"),
(102, "Ramya", 2013, "Bangalore"),
(103, "Teja", 2014, "Bangalore"),
(104, "Kumar", 2012, "Hyderabad")]

Create Dataframe out of listOfTuples
df = spark.createDataFrame(listOfTuples , ["id", "name", "year", "city"])

Check the schema
df.printSchema()
root
 |-- id: long (nullable = true)
 |-- name: string (nullable = true)
 |-- year: long (nullable = true)
 |-- city: string (nullable = true)

Print data
df.show()
+---+------+----+---------+
| id|  name|year|     city|
+---+------+----+---------+
|101|Satish|2012|Bangalore|
|102| Ramya|2013|Bangalore|
|103|  Teja|2014|Bangalore|
|104| Kumar|2012|Hyderabad|
+---+------+----+---------+

Enjoy Spark!

Tuesday, January 3, 2017

Integrate third party package to Spark application

In this post, I’ll show you how to integrate third party packages (like spark-avro, spark-csv,  spark-redshift, spark-cassandra-connector, hbase) to your Spark application.

Lets take an example spark-avro, which allows you to read/write data in the Avro format using Spark.

Different ways to integrate third party package with Spark Application

Include package to Spark Shell/Applications using --jars
Download the jar file (spark-avro_2.11-3.1.0.jar) from below URL
https://spark-packages.org/package/databricks/spark-avro

Launch the spark shell with the jar file:
$SPARK_HOME/bin/spark-shell --jars <DOWNLOAD_PATH>/spark-avro_2.11-3.1.0.jar

Run Spark Application with jar file:
spark-submit --jars <DOWNLOAD_PATH>/spark-avro_2.11-3.1.0.jar <SPARK_SCRIPT>.jar

Include package in your Spark Shell/Applications using --package
Add maven coordinate as a argument to --package then it will install and available to use in your Spark Application. If you want pass multiple packages then list the packages with comma as separator.

Launch the spark shell with --package
$SPARK_HOME/bin/spark-shell --packages com.databricks:spark-avro_2.11:3.1.0

Run Spark Application with --package
spark-submit --packages com.databricks:spark-avro_2.11:3.1.0 <SPARK_SCRIPT>.jar

Try the following script to test the package:
// import packages 
import com.databricks.spark.avro._
import org.apache.spark.sql.SparkSession

val spark = SparkSession.builder().master("local").getOrCreate()

// Read Avro data 
val df = spark.read.format("com.databricks.spark.avro").load("<INPUT_DIR>")

// Write Avro
df.write.format("com.databricks.spark.avro").save("<OUT_DIR>")

Change the highlighted part to the location of Avro data to read/write.

Enjoy Spark!

Friday, November 4, 2016

UBER mode in Hadoop2 and its configuration

ResourceManager will create separate container for mapper and reducer by default. In Uber mode will allows to run mapper and reducer in the same process as the ApplicationMaster.

Jobs running in uber mode are Uber Jobs. Uber jobs are executed within the ApplicationMaster. Rather then communicate with ResourceManager to create the mapper and reducer containers. The ApplicationMaster runs the map and reduce tasks within its own process and avoided the overhead of launching and communicate with remote containers.

Why we go for UBER Mode?
If you have a small dataset or you want to run MapReduce on small amount of data, Uber configuration will help you out, by reducing additional time that MapReduce normally spends mapper and reducers phase.

Uber mode supports only for map-only jobs and jobs with one reducer.

Configurations to enable jobs to run in UBER Mode
There are four core settings around the configuration of UBER Jobs in the mapred-site.xml. 

Configuration options for Uber Jobs:

mapreduce.job.ubertask.enable (Default = false)
Whether to enable the small-jobs "ubertask" optimization, which runs "sufficiently small" jobs sequentially within a single JVM. 

mapreduce.job.ubertask.maxmaps (Default = 9)
Threshold value for the number of maps beyond which a job is considered too large for the ubertasking optimization. Users can override this value, but only downward.

mapreduce.job.ubertask.maxreduces (Default = 1)
Threshold value for the number of reduces beyond which a job is considered too large for the ubertasking optimization. 
Note: Currently the code can't support more than one Reducer and will ignore larger values.

mapreduce.job.ubertask.maxbytes (Default = HDFS Block Size)
Threshold value for the number of input bytes beyond which a job is considered too large for the ubertasking optimization.
If no value is specified, dfs.block.size is used as the default. Be sure to specify a default value in mapred-site.xml if the underlying file system is not HDFS.


Friday, October 14, 2016

Saving Hive Query Result to HIVE TABLE or FILESYSTEM

In this post, we will see how to save hive query result to a HIVE TABLE or FILE SYSTEM.

We can achieve this by using the INSERT clause.

Let say we have customer table
hive> select * from customer;


Saving Query Results to a Table
If we want to load customers who are from city_1 to a table:
hive> INSERT OVERWRITE TABLE customers_city1 SELECT * FROM customers WHERE city='city_1';

hive> select * from customers_city1;


If we don't want to delete existing data, then use below query:
hive> INSERT INTO TABLE customers_city1 SELECT * FROM customers WHERE city='city_1';

Note: Destination table must already exists

Saving Query Results to a FileSystem

If we want to save query result to a Hadoop FileSystem (HDFS), use below query:
hive> INSERT OVERWRITE DIRECTORY '/home/cloudera/result/customers' SELECT * FROM customers WHERE city='city_1';


Add LOCAL keyword to save query result to local filesystem:
hive> INSERT OVERWRITE LOCAL DIRECTORY '/home/cloudera/customers' SELECT * FROM customers WHERE city='city_1';


Note: Writes query result in text files with default delimiter '\t'.

Thursday, October 13, 2016

Passing values to Hive script at runtime time to make reusable script

When we are play around with data warehousing it's very common to pass values at runtime. Normally write our series of hive queries in a file and run it using hive -f option from UNIX shell or bash or schedule with workflow management systems like Oozie, Airflow, etc.

Let say we want see top 10 records of a table, we will write below query to a file say get_top_records.hql.
$ cat get_top_records.hql
SELECT * FROM CUSTOMERS LIMIT 10;

Running hive script using hive -f option from UNIX shell
$ hive -f get_top_records.hql

In the above script, table name and limit are hard coded, if you want to retrieve top 10 records of different table or to change the limit then we have to write new script or modify the script. To make reusable script table name and limit to be passed when you are running the script.

We can achieve this with the help of -hiveconf. We will see how to use -hiveconf to avoid hard coding and make reusable script.

Change above script with parametarised that to be passed while running the script.
$ cat get_top_records.hql
SELECT * FROM ${hiveconf:tablename} limit ${hiveconf:limit}

Now we need to pass two parameters tablename and limit while running the script like
$ hive -f get_top_records.hql -hiveconf tablename=CUSTOMERS -hiveconf limit 5

Now its reusable script, you can get top records of any table by passing table name and top records count
$ hive -f get_top_records.hql -hiveconf tablename=SALES -hiveconf limit 10

We can also set hive config parameters also by using -hiveconf. Let say we need to enable compression and set compress codec to SNAPPY:
$ hive -f create_table.hql  -hiveconf hive.exec.compress.output=true -hiveconf mapred.output.compress=true -hiveconf mapred.output.compression.codec=org.apache.hadoop.io.compress.SnappyCodec

Tuesday, June 30, 2015

Load XML file into Hive Table using xpath

Here is a sample input XML file: 

$cat employees.xml
<employee>
<id>1</id>
<name>Satish Kumar</name>
<designation>Technical Lead</designation>
</employee>
<employee>
<id>2</id>
<name>Ramya</name>
<designation>Testing</designation>
</employee>

Step:1 Bring each record to one line, by executing below command


$cat employees.xml | tr -d '&' | tr '\n' ' ' | tr '\r' ' ' | sed 's|</employee>|</employee>\n|g' | grep -v '^\s*$' > employees_records.xml

$cat employees_records.xml
<employee> <id>1</id> <name>Satish Kumar</name> <designation>Technical Lead</designation> </employee>
<employee> <id>2</id> <name>Ramya</name> <designation>Testing</designation> </employee>

Step:2 Load the file to HDFS

$hadoop fs -mkdir /user/hive/sample-xml-inputs

$hadoop fs -put employees_records.xml /user/hive/sample-xml-inputs

$hadoop fs -cat /user/hive/sample-xml-inputs/employees_records.xml
<employee> <id>1</id> <name>Satish Kumar</name><designation>Technical Lead</designation> </employee>
<employee> <id>2</id> <name>Ramya</name> <designation>Testing</designation> </employee>

Step:3 Create a Hive table and point to xml file

hive>create external table xml_table_org( xmldata string) LOCATION '/user/hive/sample-xml-inputs/';

hive> select * from xml_table_org;
OK
<employee> <id>1</id> <name>Satish Kumar</name> <designation>Technical Lead</designation> </employee>
<employee> <id>2</id> <name>Ramya</name> <designation>Testing</designation> </employee>

Time taken: 0.179 seconds

Step 4: From the stage table we can query the elements and load it to other table.

hive> CREATE TABLE xml_table AS SELECT xpath_int(xmldata,'employee/id'),xpath_string(xmldata,'employee/name'),xpath_string(xmldata,'employee/designation') FROM xml_table_org;
Total MapReduce jobs = 3
Launching Job 1 out of 3
Number of reduce tasks is set to 0 since there's no reduce operator
Starting Job = job_201506301103_0001, Tracking URL = http://0.0.0.0:50030/jobdetails.jsp?jobid=job_201506301103_0001
Kill Command = /usr/lib/hadoop/bin/hadoop job  -kill job_201506301103_0001
Hadoop job information for Stage-1: number of mappers: 1; number of reducers: 0
2015-06-30 11:23:10,969 Stage-1 map = 0%,  reduce = 0%
2015-06-30 11:23:18,040 Stage-1 map = 100%,  reduce = 0%, Cumulative CPU 0.95 sec
2015-06-30 11:23:19,058 Stage-1 map = 100%,  reduce = 0%, Cumulative CPU 0.95 sec
2015-06-30 11:23:20,067 Stage-1 map = 100%,  reduce = 0%, Cumulative CPU 0.95 sec
2015-06-30 11:23:21,079 Stage-1 map = 100%,  reduce = 100%, Cumulative CPU 0.95 sec
MapReduce Total cumulative CPU time: 950 msec
Ended Job = job_201506301103_0001
Ended Job = 1716336105, job is filtered out (removed at runtime).
Ended Job = -578743888, job is filtered out (removed at runtime).
Moving data to: hdfs://localhost.localdomain:8020/tmp/hive-cloudera/hive_2015-06-30_11-22-59_851_2446083450544691385-1/-ext-10001
Moving data to: hdfs://localhost.localdomain:8020/user/hive/warehouse/xml_table
chgrp: changing ownership of 'hdfs://localhost.localdomain:8020/user/hive/warehouse/xml_table': User does not belong to hive
Table default.xml_table stats: [num_partitions: 0, num_files: 1, num_rows: 0, total_size: 46, raw_data_size: 0]
2 Rows loaded to hdfs://localhost.localdomain:8020/tmp/hive-cloudera/hive_2015-06-30_11-22-59_851_2446083450544691385-1/-ext-10000
MapReduce Jobs Launched: 
Job 0: Map: 1   Cumulative CPU: 0.95 sec   HDFS Read: 435 HDFS Write: 46 SUCCESS
Total MapReduce CPU Time Spent: 950 msec
OK
Time taken: 21.649 seconds

hive> select * from xml_table;                                       OK
1 Satish Kumar Technical Lead
2 Ramya Testing

Time taken: 0.143 seconds


Saturday, December 27, 2014

Tables in Hive

A Hive table is logically made up of the data being stored and the associated metadata describing the layout of the data in the table. The data typically associated resides in HDFS, although it may reside in any Hadoop file system, including the local file system or s3. Hive stores the metadata in relational databases and not in HDFS.

Each table has a corresponding directory in HDFS and the data is Serialized and stores in files within the directory.

Different types of Tables

Managed Tables
Managed Tables are nothing but when you create the table in hive, by default hive will manage the data, which means that hive controls the lifecycle of the data into its warehouse directory.
Hive stores the data for these tables in a subdirectory under the directory defined by
hive.metastore.warehouse.dir (e.g., /user/hive/warehouse), by default.

hive> CREATE TABLE workshop.sample(key int, value string)ROW FORMAT DELIMITED FIELDS TERMINATED BY ',' STORED AS TEXTFILE;

If you’re not currently working in the target database, then you can prefix the database name. In the above statement we mentioned workshop as database.

If you add the option IF NOT EXISTS, Hive will silently ignore the statement if the table already exists. This is useful in scripts that should create a table the first time they run.

Note: 
When a managed table gets dropped, both the metadata and data get dropped. However, managed tables are less convenient for sharing with other tools.


External Tables
Suppose we have data that is created and used primarily by Pig or other tools, but we want to run some queries against it, but not give Hive ownership of the data. We can define an external table that points to that data, but doesn't take ownership of it.

External table is nothing but when you create the table in hive, the data stored at an existing location outside the warehouse directory.

Create an External table and points the location of the data like

hive>CREATE EXTERNAL TABLE sample (key int, value string) ROW FORMAT DELIMITED FIELDS TERMINATED BY ',' STORED AS TEXTFILE LOCATION '/data/sample';

An EXTERNAL table points to any HDFS location for its storage, rather than being stored in a folder specified by the configuration property hive.metastore.warehouse.dir.


Note:
  • External table are virtual tables, not physically shown in HDFS.
  • External table won’t load data; just it points the location of the data.
  • When an external table is dropped, the data associated with it doesn’t get deleted, only the metadata (number of columns, type of columns, terminators, etc.) gets dropped from the Hive Metastore.
  • When you want to do process on other module data, external table are useful. Since External table create a virtual table points to data and process on the data without modifying the original data.


How do you check existing table is managed or external table?

To check that we use describe command like below

describe formatted tablename;

It displays complete meta data of a table. 
You can find row key as Table Type which will display either MANAGED_TABLE OR EXTERNAL_TABLE

Eg:

If it is managed table, you will see
Table Type:             MANAGED_TABLE

If it is external table ,you will see
Table Type:             EXTERNAL_TABLE


Very Useful Hive CLI settings

hive.cli.print.current.db [Show the current database as part of the prompt]


The USE command sets a database as your working database, analogous to changing working directories in a filesystem:
hive> USE workshop;

There is no command to show you which database is your current working database.


To show the current database as part of the prompt, set the property 'hive.cli.print.current.db' to show the current database as part of the prompt:

hive> set hive.cli.print.current.db=true;
hive (workshop)> USE default;
hive (default)> set hive.cli.print.current.db=false;
hive> 

hive.cli.print.header [Print table columns header]

CLI to print column headers, which is disabled by default. We can enable this feature by setting

hive> set hive.cli.print.header=true;
hive> SELECT * FROM employee LIMIT 2;
employee.id employee.name employee.age
101 Satish 30
102 kumar 29


Friday, December 26, 2014

Databases in Hive

In Hive, database is just a catalog or namespace of tables. However, they are very useful for larger clusters with multiple teams and users, as a way of avoiding table name collisions. It’s also common to use databases to organize production tables into logical groups.
If you don’t specify a database, the default database is used.

Create a DataBase

hive> CREATE DATABASE workshop;
Throw an error if workshop database already exists. 

You can suppress these warnings with below variation:
hive> CREATE DATABASE IF NOT EXISTS workshop;
IF NOT EXISTS clause is useful for scripts that should create a database on-the-fly, if necessary, before proceeding.

Note:
Hive will create a directory for each database under a top-level directory specified by the property hive.metastore.warehouse.dir. (default value is /user/hive/warehouse).

Eg: when the 'workshop' database is created, Hive will create the directory /user/hive/warehouse/workshop.db. (Note the .db extension).

All the tables of the database will be stored in sub-directories of the database directory. The exception is tables in the default database, which doesn't have its own directory.

You can override the default location for the new directory as shown in this example:
hive> CREATE DATABASE workshop LOCATION '/hive_workshop’;

You can add a descriptive comment to the database, which will be shown by the
hive> CREATE DATABASE workshop COMMENT 'Holds all my exercises in Hive';

Database Schema

hive> DESCRIBE DATABASE workshop;

OK
workshop Holds all my exercises in Hive hdfs://satishkumar/user/hive/warehouse/workshop.db satishkumar
Time taken: 0.026 seconds, Fetched: 1 row(s)

DESCRIBE DATABASE also shows the directory location for the database. If you are running in pseudo-distributed mode, then the master server will be localhost. For local mode, the path will be a local path, file:///user/hive/warehouse/workshop.db.

You can associate key-value properties with the database, although their only function currently is to provide a way of adding information to the output of DESCRIBE DATABASE EXTENDED <database>:

hive> CREATE DATABASE workshop WITH DBPROPERTIES ('creator' = 'Satish Kumar', 'date' = '2014-12-28');

hive> DESCRIBE DATABASE workshop;                                                                    
OK
workshop hdfs://satishkumar/user/hive/warehouse/workshop.db satishkumar
Time taken: 0.026 seconds, Fetched: 1 row(s)

List of DataBases

At any time, you can see the databases that already exist as follows:
hive> SHOW DATABASES;
default
workshop

If you have a lot of databases, you can restrict the ones listed using a regular expression like
hive> SHOW DATABASES LIKE 'w.*';
workshop 
It lists only those databases that start with the letter ‘w’ and end with any other characters.

Set Working Database

The USE command sets a database as your working database, analogous to changing working directories in a filesystem:

hive> USE employee_db;

Note: There is no command to show you which database is your current working database.

Drop a DataBase

hive> DROP DATABASE IF EXISTS workshop;
The IF EXISTS is optional and suppresses warnings if workshop doesn't exist.

By default, Hive won’t permit you to drop a database if it contains tables. You can either drop the tables first or append the CASCADE keyword to the command, which will cause the Hive to drop the tables in the database first:

hive> DROP DATABASE IF EXISTS financials CASCADE;

Using the RESTRICT keyword instead of CASCADE is equivalent to the default behavior, where existing tables must be dropped before dropping the database. When a database is dropped, its directory is also deleted.

Alter a DataBase

You can set key-value pairs in the DBPROPERTIES associated with a database using the
ALTER DATABASE command. No other metadata about the database can be changed,
Including its name and directory location:

hive> ALTER DATABASE workshop SET DBPROPERTIES ('edited-by' = 'Teja');

There is no way to delete or “unset” a DBPROPERTY.

Setup and Configure Hive

Step 1: 
Download latest Hive from Apache Download Mirrors and derby db.
https://archive.apache.org/dist/hive/hive-0.13.1/
http://db.apache.org/derby/releases/release-10.10.2.0.cgi

Step 2: 
Un-tar the files to your working directory.

Step 3: 
Set environment variable  for the Hive home directory in .bashrc file.
export HIVE_HOME="/home/satishkumar/WORK/apache-hive-0.13.1-bin"
export PATH=$PATH:$JAVA_HOME/bin:$HADOOP_HOME/bin:$HIVE_HOME

Step 4: 
Close the terminal and open to verify the environment variable for the Hive is configured or not.
$echo $HIVE_HOME

Step 5: Start derby
Here we are using default db as derby for storing Hive Metadata. Start derby by using following commands
./startNetworkServer -h 0.0.0.0 &   
    or in case of any exception  
./startNetworkServer -noSecurityManager 

Step 6: 
Add/Update Configurations in hive-site.xml
<configuration>  
<property>  
  <name>javax.jdo.option.ConnectionURL</name>  
  <value>jdbc:derby://localhost:1527/myderby1;create=true</value>  
 <description>JDBC connect string for a JDBC metastore</description>
</property>  
  <property>  
 <name>javax.jdo.option.ConnectionDriverName</name>  
 <value>org.apache.derby.jdbc.ClientDriver</value>  
 <description>Driver class name for a JDBC metastore</description>  
</property>  
</configuration>

Step 7:
Copy derby librarires to hive/lib. (Here we are using derby as MetaData, so copying all the derby libraries to Hive)
1) Delete if any derby lib is already there in hive/lib folder. 
2) copy derby.jar, derbyclient.jar, derbytools.jar from derby/lib into hive/lib.

Step 8:
Start Hive with following command
$> bin/hive 

Why go for Hive When Pig is There?


  • Pig 
    • Procedural data-flow language 
    • Pig is used by Programmers and Researchers. 
    • Pig is on the client side. 
    • For managing and querying unstructured data. 
      
  • Hive 
    • Declarative SQLish Language 
    • Hive is used by analysts generating data reports. 
    • Hive is on cluster side. 
    • For managing and querying structured data. 

Features 
Hive 
Pig 
Language 
SQL-like 
PigLatin 
Schemas/Type 
Yes (explicit) 
We have to create "tables" beforehand and stores the schema in a either shared or local database for metadata. 
Yes (implicit) 
No need to create table. 
Partitions 
Yes 
No 
Server 
Optional (Thrift) 
No 
UDF 
Yes (Java) 
Yes (Java) 
Custom Serialize/Deserializer 
Yes 
Yes 
DFS Direct Access 
Yes (implicit) 
We never point to the actual HDFS folder. 
Yes (explict) 
We explicitly point to HDFS folder. 
Join/Order/Sort 
Yes 
Yes 
Shell 
Yes 
Yes 
Streaming 
Yes 
Yes 
WebInterface 
Yes 
No 
JDBC/ODBC 
Yes (limited) 
No